Software version EVN-1.8.
1.QUICK GUIDE
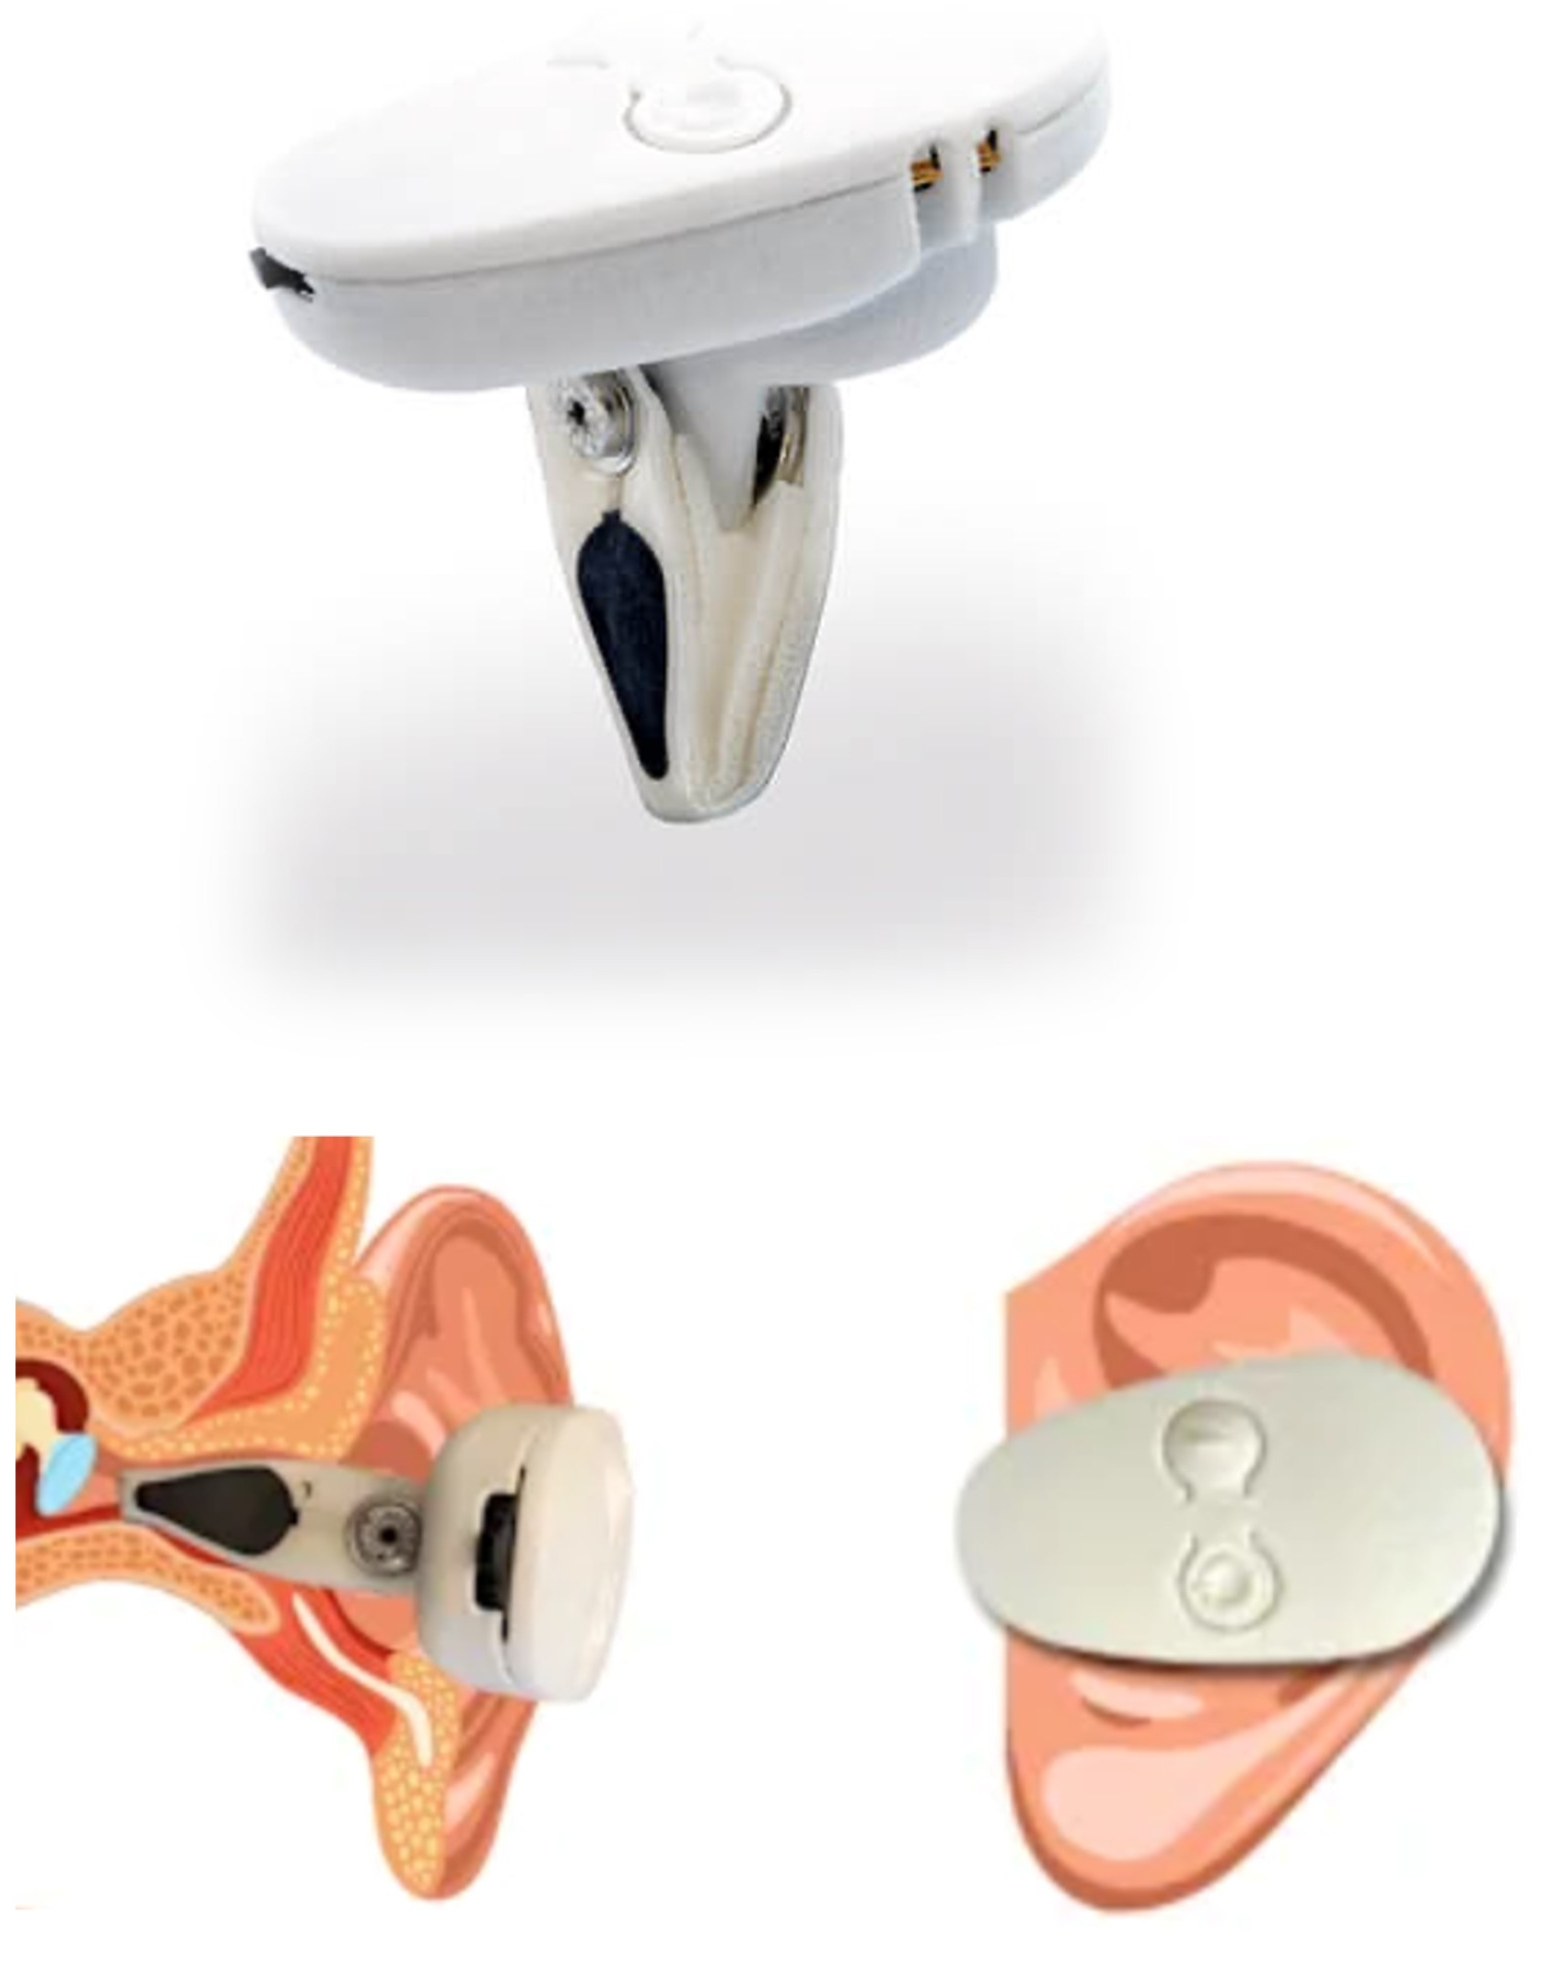
THE EAR UNIT
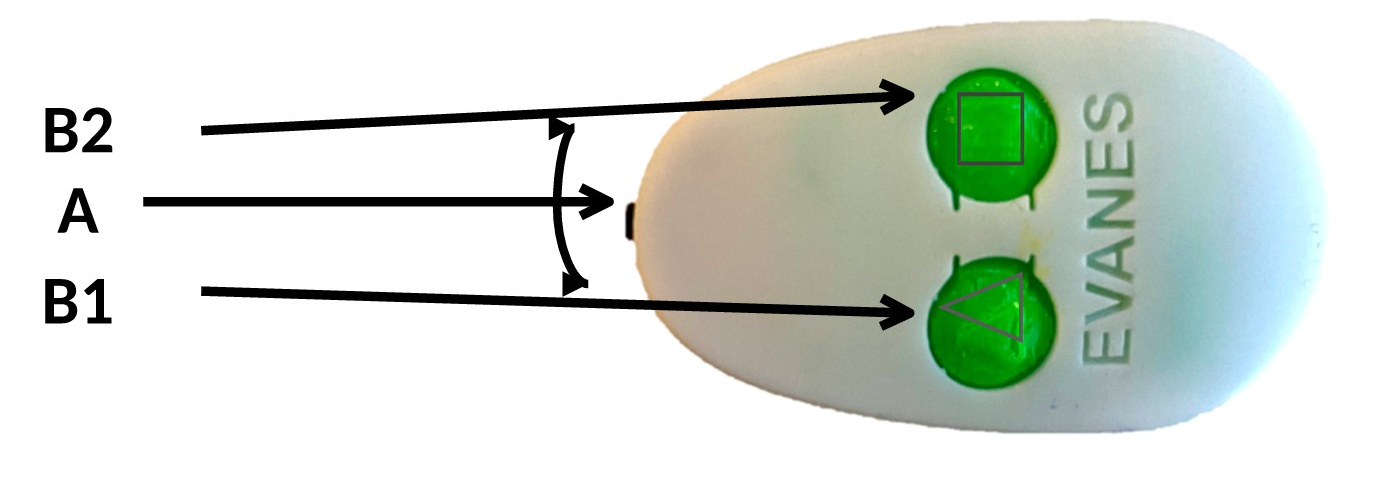
Buttons:
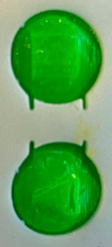
B2: “Square”. Choose the MANUAL mode and increase stimulation current.
B1: “Triangle”. Choose the AUTOMATIC mode and reduce stimulation current.
Device off: press 4 seconds
Note: the buttons may come in different colours, like green, white and blue.

A: Push once to start the treatment after choosing the mode.
Adjust audio volume rocking up or down.
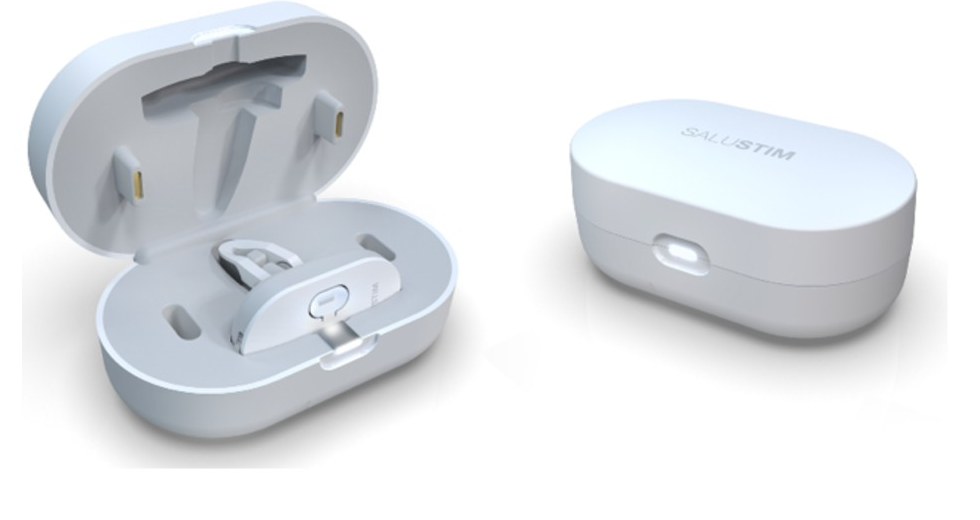
THE CHARGER UNIT
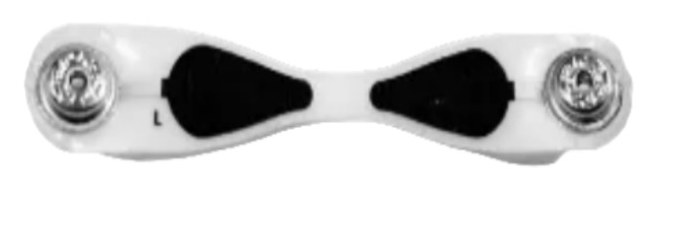
THE EAR ELECTRODE
Preparation, recharging
- Connect the charger to USB power source +5 VDC using USB C -connector and cable (not included in the package).
- Set the ear electrode (size L or S) into its place by snapping the metal clips in place.
- Set the device into the charger for charging. Pls note: the device can also be charged without the electrode.
- Ensure the device sits well in its position and close the charging box. The charging begins and LED will start the fading animation.
- Charging will take 2-3 hours. When the device is charged the LED will stop the slow blinking animation and stay dimly lit.
Turning EVANES on and setting it into the ear
- Take the device from the charger.
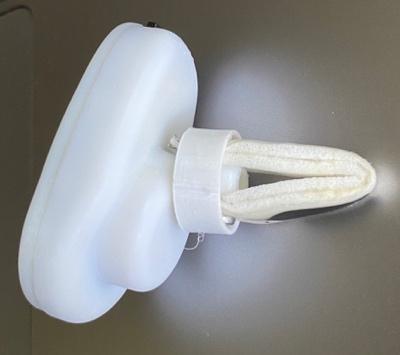
- Optional: place the optional white rubber support ring on the base of the electrode so that it covers the metal fasteners.
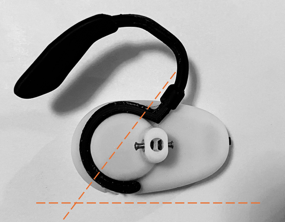
- Optional: place the optional ear hook on the base of the device. Note the angle.
- Recommendation: to improve the skin contact moist the black areas of the electrode by drop of water, saliva or conductive ECG or EGG paste.
Choosing the treatment mode
- Press either one of the buttons B1 (automatic) or B2 (manual) to wake the device up.
- At this stage, you can change your mode selection back and forth; your selection will only be activated once you press A.
- Press B1 to choose Automatic Mode
- Press B2 to choose Manual Mode.
- LED starts to blink. See below for more info about choosing a mode.
- The device awaits for you to set it into your ear and push the button A to start the treatment.
- Set the device into your left ear by pushing the electrode carefully into the ear canal.
Starting treatment
- Push Button A to start the treatment mode of your choice.
AUTOMATIC MODE B1:
- After starting the treatment by pushing button A, the led blinks every second until treatment begins.
- Audio instructions begin playing once the device senses skin contact: “Start by setting audio volume, adjust volume by moving volume button up or down”.
- You will also hear ocean wave sound (to be used optionally as breathing rhythm guide).
- If needed, adjust the audio volume by rocking the button A up for more volume and down for less. Each step gives a short tone at the new level.
- During speech, adjustment affects only speech volume.
- When you haven't changed the volume for about 15 seconds, the device moves on. To move on at once, press button A.
- You will also hear ocean wave sound (to be used optionally as breathing rhythm guide).
- The program proceeds to checking skin contact:
- “Checking contact, set the device on the ear”
- The device will now check that the contact to the skin is stable. This should take few seconds.
- If contact is NOT good enough, the device repeats “set the device on the ear”. Push the device gently a little deeper into the ear canal or moisten the contact surfaces.
- If good contact is not found within about a minute, the device says “Poor contact” and stops. Re-seat the device in the ear canal and press button A to try again.
- “Checking contact, set the device on the ear”
- When the contact is GOOD the program proceeds and says:
- “Contact good, treatment starts, Automatic amplitude: adjust by pressing up and down buttons”.
- The current rises gradually to the treatment level. This can take up to 20 seconds. The device then says “Amplitude” with the current level as three (3) digits: “one, three, zero” means 1.30 milliampere (mA).
- In your first sessions the starting level is 1.30 mA.
- After that, the device starts at the level you have recently used (if you have raised or lowered it). You do not need to adjust it.
- If needed, adjust the current by pressing B2 (up by 0.1 mA) or B1 (down). Each press gives a short two-tone confirmation sound, and the new level is spoken out when you stop pressing.
- Every 10 minutes the device says “Ten minutes done”, “Twenty minutes done” and so on, followed by the current level.
- The led shows how far the session has gone: one blink at a time in the first 10 minutes, two in the next 10 minutes, and so on.
- After 60 minutes the device says “Sixty minutes done” and “Treatment ends”, and switches off.
- Pausing and resuming
- To pause treatment, press button A; the device switches off.
- Press A within 2 minutes to continue where you stopped.
- With pause longer than 2 minutes, pushing A starts a new session.
- If contact is lost during treatment, the device first tries to restore it by itself, quietly. If it cannot restore the contact, it says “Poor contact” and suggests how to improve it, and stops.
- Re-position the device and press A within 2 minutes to continue the same session.
- To switch the device off, hold B1 for 3 seconds.
- Push A button within 2 minutes after a session has ended starts a new session at once, if the daily limit allows.
- If the daily treatment time has been used up, the device says “Cumulative treatment time exceeded” and switches off.
- The device allows 240 minutes usage per 24 hrs.
- To pause treatment, press button A; the device switches off.
MANUAL MODE B2:
- Once you've chosen B2/Manual Mode and set the device into your left ear, Begin the treatment by pressing Button A once.
- The device will start to give audio instructions: “Treatment starts. Press up until you feel the treatment. When you feel it, press two steps down”
- If you want higher treatment level, press B2 to increase the level, 1 press means +0.1 mA.
- If you want lower treatment level, press B1 to reduce the level, 1 press means - 0.2 mA.
The device announces the treatment parameters as mA's (similarly as it does in the Automatic mode).
- After 10minutes the device informs:
- “10 minutes done”
- After 20minutes the device informs:
- “20 minutes done”
This will be repeated until 60 minutes are done if not stopped earlier.
After 60 minutes the device announces:
- “60 minutes done. Take the device off”.
- The device stops and goes to standby.
2.PACKAGE CONTENT
The product package of EVANES by SaluStim consists of :
- The Ear Unit
- The Charger Unit
- Exchangeable Ear Electrodes available with sizes Small (S) and Large (L)
- Link to online user instructions
Various accessories may be offered, some for free and some for purchase.
3.EVANES taVNS by SALUSTIM
Background and treatment description
EVANES device is the first wireless taVNS stimulator designed to be worn in the user's ear canal.
EVANES is designed to manage and reduce stress of a person. The device enhances and stimulates human body by activating parasympathetic tonus by balancing imbalanced autonomous nerve system.
The device uses two parallel stimulation methods which can be used together.
Firstly it produces transcutaneous electric stimulation to auricular vagus nerve branch fibers located on the outer ear (taVNS). The non-invasive electrodes of the device are placed against the skin of the outer ear canal.
A stimulation period is typically 5-60 minutes switched periodically on and off. The stimulation period can be repeated 1-3 times per day and continue over 1-90 days.
Secondly, EVANES produces breathing pace guidance through an audio tone resembling ocean waves. The device indicates in and out breathing phases with a separate audio tones at a suitable frequency. It is known that breathing at low rate 10-12 seconds per one breathing cycle activates vagus nerve which enhance parasympathetic tone, improves HRV, and reduces stress.
EVANES breathing pace guidance is set to nominal 12s cycle, consisting of 2,5s “inhalation cycle”, 1s pause and subsequent 7,5s “exhalation cycle” and 1s pause.
A stimulation of vagus nerve is known to affect positively to person’s health. It has been reported and validated to:
- increase parasympathetic activity, and/or reduce sympathetic activity
- increase heart rate variability
- reduce effect of tinnitus, and relieve tinnitus caused stress
- reduce stress
- improve sleep and sleep measures
- improve cognitive skill
- reduce burden of atrial fibrillation (i.e. length and frequency of AF periods)
EVANES skin contact test is important part of the experience as the device does not begin the treatment unless the contact is well enough to carry current into the tissue. EVANES keeps checking the skin contact throughout the treatment session and should the quality of the contact change too much the device will inform the user about it and suggests to reposition the device in the earcanal for better contact.
Intended Purpose
The intended use of the product EVANES is for :
- Alleviating mental stress and tinnitus-related mental stress (TRMS) by means of reducing the sympathetic prevalence and/or increasing the parasympathetic activity in generally stressed individuals.
- Relief from pain, insomnia, anxiety, and burn out by means of reducing the sympathetic prevalence and/or increasing the parasympathetic activity associated with the disorders.
- Relief of tinnitus by means of reducing the annoyance and loudness of tinnitus by allowing the habituation to take place.
Intended User Group
The intended user group is 15 years and older.
The intended users are having a normal hearing capability (for audio instructions) and having normal cognitive skills for operating a smart phone or corresponding electrical device.
A typical user is keen on her/his health and wellness. The user is intended to improve his/her wellness, reducing stress level, enhancing relaxation.
The user may also be keen to improve or strengthen his/her cognitive skills and learning ability.
The user may suffer from stress, sleep problems, tinnitus or other health problem which cause stress.
The users excluded:
- Users with pacemaker or other stimulator or implanted electrical devices
- Users being impaired to use and control electrical device (such as a mobile device or similar)
- Users being impaired with sensation of pain
- Users being impaired with hearing
- Users having heart health issues must consult their medical doctor before use.
Intended Use Environment
Intended use environment for device is normal home, office and health clinic environment.
The use environment will be a normal room condition (temperature +15 - +30°C, humidity 20-70% RH).
The device is not intended to be used in facilities providing emergency medical services or critical life-supporting treatment services, or in operating rooms or similar environments where the patient is connected to other medical devices.
Precautions
- Use only EVANES electrodes designed for the Ear Unit.
- Use only a standard USB-C connector to connect the charger to the USB charger 5V with USB connector.
- Do not place the device near excessive heat or in water.
- Long-term taVNS stimulation at the electrode site may cause skin irritation. If therapy is experienced unpleasant, discontinue use until re-evaluated by a therapist or physician.
- Keep the device out of the reach of children.
- Do not use the device, if it is broken (plastic parts are broken, cracked, electrode contacts are detached).
- If you feel that treatment current is inconvenient, reduce the treatment intensity by pressing B1 button or remove the device from the ear.
- If you feel pain during the treatment remove the device from the ear and turn it off or place in charger. Wait at least 5 minutes before starting the treatment again. Then, if you feel pain again, contact your therapist or us.
Adverse reactions
- Allergic reactions are rare. However, an allergic reaction to the electrode may occur in the form of skin irritation. An electrode burn on the electrode site may rarely occur. If skin irritation persists, discontinue the use and consult a therapist or physician.
- If you feel inconvenience or any health-related symptoms during the treatment, remove the device from the ear.
4.TECHNICAL CONSTRUCTION AND SPECIFICATION
Technical Construction
The product consists of a wearable wellbeing device with an electrode unit. The device is used in a user's ear (electrode inside the outer ear canal). The product consists also a charging box unit for charging the wearable device when it is not in use.
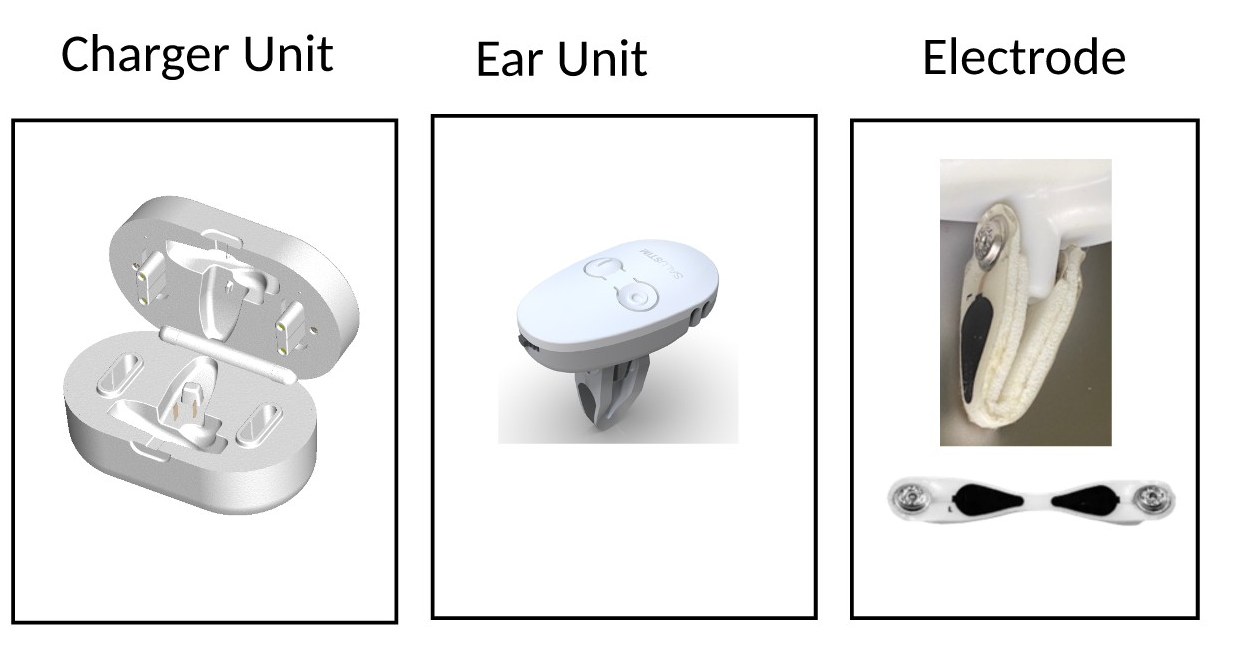
The product elements are: the ear device unit, charger unit and ear electrode unit as shown in Fig. 1. The charger input device does not belong to the product. It is an external low power unit (5V-USB-C) which will be used for powering the charger when the ear unit is set into the charger for recharging.
The ear electrode unit comprises two electrode areas for delivering the stimulation current to the user's skin of the ear canal. The electrode unit is smooth and intended to be used several times. The electrode unit is connectable / disconnectable by snap connectors to the ear device unit. Different sizes of electrodes will be offered to fit optimally to user's ear.
The ear device unit is the main part of the system. It is rechargeable battery operated. The recharging is only possible when the device is set on the charger box. The treatment is not possible during the device is in the charger box. The ear device unit comprises control buttons and a LED indicator.
The control button A controls audio volume by sliding up and down. Pushing control button A starts the treatment after the desired treatment mode has been selected (B1 or B2). During the treatment pushing button A puts the device into Pause mode.
The control buttons B (1 and 2) are to be used to select the desired treatment mode automatic mode (B1) or manual mode (B2).
During the treatment buttons B1 & B2 control the intensity of the stimulation current.
The ear device unit has an electronic unit with a microcontroller which controls and monitors the device.
The LED indicator indicates the status of the device and status of the charging during charging. The LED indicator is visible when the ear device unit is set in the charger box and is charging.
The charger box is used as a storage and carry-on box for the ear device unit when it is not in use. The ear device unit can be charged in the charger box when the charger device unit is connected to external low voltage (5V) USB-C power source.
The charger box comprises the charging pins for the ear device unit. The charger box has also a self-test circuitry for testing the ear device unit.
The charger box is designed in the way that when it is open the powered charging pins are not reachable and touchable by users' finger. Thus, the charging is only possible when the charger box is closed. The charger box has a USB-C connector for the charger input device (5VDC).
The charger input device nor USB-USB-C cable are not part the EVANES product package.
The EVANES mobile application will be available at a later announced time.
Technical Specification
- Device: EVANES taVNS device by SaluStim
- Output: max 7 mA (peak-to peak) across 10000 Ohm load
- Pulse width: 500μs (positive pulse 250μs followed by negative pulse 250μs)
- Waveform: Symmetric biphasic rectangular
- Pulse rate: 20 Hz
- Breathing guidance period: 12 seconds: 2.5s inhale, 1 s break, 7.5s exhale, 1 s break.
5.TREATMENT PREPARATION
- If you have received the treatment procedure, program and guidance from your doctor or therapist, please follow that.
- The treatment can be for example two 30-60 minutes sessions per day (morning time and evening time) and continuing 1-3 weeks.
- The sensitive users may begin treatment with Manual mode for 1-2 minutes.
- Due to safety and convenience the device will limit the maximum use time to 60 minutes per session and 120 minutes during the 24 hours.
Preparation for the treatment:
- There is not any special preparation for using the device.
- You will need to charge the device to enable to make treatment for the session.
- To prepare the treatment session to be as effective and convenient as possible, select a suitable non-disturbing time and place so that you can also relax during the treatment session planned 10-60 minutes.
During the treatment:
- It is recommended that the user does not eat (chew) while in the treatment session, as the ear canal walls will move upon chewing.
6.SAFE AND EFFECTIVE USE
- Follow strictly the instructions of the EVANES User Manual.
- Use only Salustim electrodes designed for the EVANES Ear Unit.
- Do not open Ear Unit or Charger Unit devices. In case of any technical problem contact SaluStim.
- If you the device is broken or you suspect that it does not work properly, contact SaluStim.
- EVANES taVNS G2 device does not require any particular maintenance except recharging the battery of the ear unit. The electrodes are recommended to be changed after approximately 10-15 use sessions and always if there is any defect electrode areas, or some of the soft part membranes begin to detach, or snap connectors are defected or dirty and light swiping is not enough for cleaning them. New electrodes are available to purchase from SaluStim Group.
7.CARE AND MAINTENANCE
The unit may be cleaned by wiping it with a damp cloth and a solution of mild soap and water. Wipe dry after cleaning. Do not immerse the unit in water.
The ear electrode may be cleaned by wiping it with a damp cloth and a solution of mild soap and water. Wipe dry after cleaning.
No other user maintenance of the main unit is required.
8.TROUBLESHOOTING
The device has a self-test for checking the safety and functions. In the case of detected failure the Audio will inform “Failure detected xx” (where “xx” means the error code in numbers).
In the case of “Failure detected” by the self-test or if the device does not start treatment or in case of misfunctioning audio or treatment, please do the following:
- Set the Ear Unit to the charger and connect the charger into the charger input device (make sure the 5v charging USB-C cable is connected).
- Close the lid of the charger (the device will turn off)
- Wait until the LED will perform fading animation from bright to dim, this means reset is done and charging has begun, or LED is steady dimmed (recharging ready).
Ear electrodes wear out with use. The rate of wear is influenced by factors such as skin moisture and the amount of earwax, which may cause the soft layers of the electrode to separate from one another.
A badly worn electrode surface will prevent contact checking from proceeding, so it is advisable to check the condition of the electrodes always before usage and replace any worn electrodes with new ones.
To turn the device off:
- Set the device to the charger and connect the charger into the charger input device.
- Wait until the LED will perform fading animation from bright to dim (charging begun).
Alternatively:
- Push the button B1 for 4 seconds (led will flash longer to indicate the action).
If the problem occurs, contact SaluStim representatives. Contact information presented on the last page.
9.WARRANTY
In addition to your statutory rights, the distributor agrees that if any defect in materials or workmanship appears in this product within two years of the original date of consumer purchase, it will repair (or at its option, replace) the unit free of charge for parts and labour. This applies only if the product has been used for intended purposes and not damaged through misuse, accident or neglect nor modified or repaired by anyone other than an authorized distributor or its authorized agents.
If a problem occurs, please check the unit is being used in accordance with instructions. If the fault persists after checking the troubleshooting section, return it with dated proof of purchase to your nearest stockist or original supplier. Please include your name, phone number, email and address and a description of the fault.
Note: only authorized service agents should carry out repairs to the unit. For technical documents, please contact the manufacturer.
All consumable items, battery and electrodes are not included within this warranty.
10.CONTACT
EVANES by SaluStim
SaluStim Group OyHalsuantie 1
00420 Helsinki
Finland
- Phone:
- +358 40 581 1190
- Email:
- info@salustim.com
- Web:
- www.salustim.com
- Support:
- info@evanes.fi
UDI-DI:
6429811805E000001V0286
Designed and made in Finland